I have already touched on the texturing side of things when I applied a wall texture to a plane in one of my previous posts. Now I need to expand my knowledge in this area and begin applying high resolution textures to the exterior as well as the interior set which we will be using for our film.
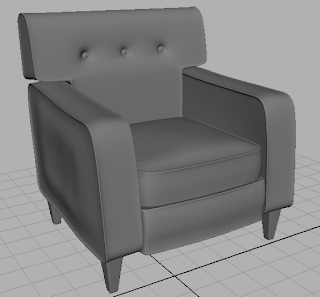
I decided to model a chair that would sit in the back of the room. I knew that the chair itself was going to be partially obscured by shadow. However, I knew this would be a good opportunity for me to broaden my skills and augment my existing knowledge to produce better quality work in preparation for industry. Here is an image of the chair I will be working on.
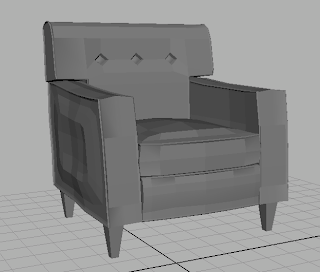
I began to model the basic shape of the chair in Maya using simple primitive cubes. Once I had blocked in the main features and created the lips in the fabric I then smoothed the image to see how the geometry worked and the mesh reacted to a smoothing node. It is important to note that the modelling phase is key. The model must be properly modelled and must have no n gons or holes which can disrupt the texture.
Once the modelling phase was dealt with I then began to re align the UV's. To do this I applied a checkered texture to the entire object. I then began to adjust and planar map the individual faces of the constituent pieces. I was careful to make sure that the squares lined up to corresponding facades and that they were equal all over the object. This process was very time consuming as I had to align the UV's on the finer details where the fabric overlapped. Originally I aligned the UV sets of individual faces but soon realized that I could UV all faces that were orientated to a particular axis. That is to say all the faces on the object that faced the x axis for example could be planar mapped at the same time which saved huge amounts time.
Once all the relevant pieces were UV'd I started to apply the texture to each individual facade. However, I soon realized that the fabric texture I created in photoshop could just be applied to the entire object. Once an object is planar mapped properly and if the object has one whole texture the material can be applied directly to the object. I could then use the UV texture editor to then adjust the resolution of the image using the scale tool.
I was very pleased with the final image but I suppose I was more excited that I had gained new skills which would enhance the way my work looked. Here are some of the composites which I created in photoshop which show the fabric texture applied. When I first rendered the scene I realized that certain areas, in particular the overlapping bits of fabric would appear stretched. This was easily solved by spacing out the necessary polygons which would prevent twisting when smoothed.
There are still a small amount of discrepancies regarding a certain amount of stretching, however the chair itself will be partially obscured by shadow and I can't waste too much time getting the perfect chair. I am happy with the outcome and my new found knowledge should be beneficial to the rest of the objects within this short film.


No comments:
Post a Comment